
Iron Remover vs. Traditional Wheel Cleaners: Which is Better for Performance and Appearance?
Iron removers are an important part of car care, especially when it comes to maintaining the appearance and longevity of your wheels. Wheels are constantly exposed to the harsh elements of the road, including brake dust, road debris, and other contaminants. Over time, these particles can accumulate on the surface of your wheels and cause damage, including staining, pitting, and corrosion. To avoid this, it's important to use an iron remover as part of your regular car care routine.

What are Iron Removers and How Do They Work?
Iron remover is a specialized cleaning product designed to remove iron contaminants from automotive surfaces, including paint and wheels. Iron contaminants can come from a variety of sources, such as brake dust, rail dust, industrial fallout, and air pollution. These iron particles can embed themselves into the surface of the paint and wheels, causing unsightly orange spots and damaging the finish over time.
Iron remover works by using a chemical reaction to dissolve the iron particles, allowing them to be safely and easily rinsed away. The active ingredient in most iron removers is a chemical called "iron chelator" or "iron reactive agent", which is designed to bond with the iron particles on the surface. When the iron particles react with the chemical, they dissolve and become a water-soluble compound that can be rinsed away.
Iron remover is particularly effective at removing iron particles that cannot be removed with traditional washing methods, such as brake dust that has been baked onto the wheels from high temperatures. It is a safe and effective way to remove iron contaminants from your car's paint and wheels, restoring their appearance and helping to prevent further damage.

Why Use an Iron Remover with a Wheel Cleaner?
Using an iron remover with a wheel cleaner is the best way to remove all of the contaminants from your wheels and protect them from future damage. Wheel cleaners work by removing dirt and grime from the wheel surface, but they don't always remove all of the iron particles. By using an iron remover before using a wheel cleaner, you can ensure that all of the iron particles are removed and that your wheels are thoroughly cleaned.

Step-by-Step Guide to Using an Iron Remover with a Wheel Cleaner:
Step 1: Gather your supplies. You'll need an iron remover, a wheel cleaner, a bucket, a brush or sponge, and a clean, dry cloth.
Step 2: Prepare the wheels. Make sure the wheels are cool to the touch and free of any loose debris. This will make it easier to clean the surface and prevent any damage to the wheels during the cleaning process.
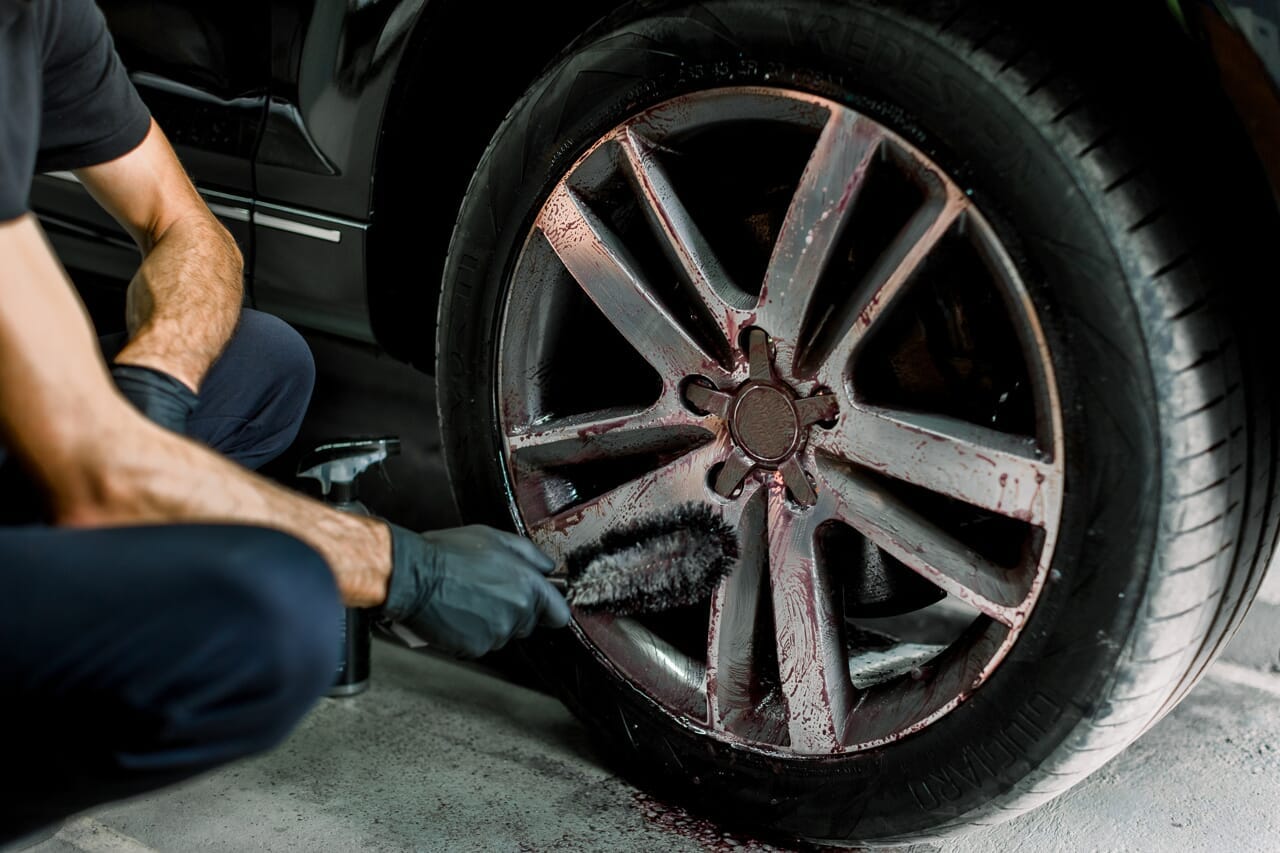
Step 3: Apply the iron remover. Pour the iron remover into a spray bottle or apply it directly onto the wheel surface with a brush or sponge. Make sure to cover all areas that are contaminated with iron particles, including the spokes, lug nuts, and other crevices. Follow the manufacturer's instructions for the recommended application time, which can range from 5 minutes to an hour or more.
Step 4: Agitate the surface. Use a brush or sponge to agitate the iron remover on the wheel surface, working it into the contaminants. This will help to dissolve and remove the iron particles. If necessary, add a little water to help loosen the contaminants and make them easier to remove.
Step 5: Rinse the wheels. Rinse the wheels thoroughly with water to remove the iron remover and any dissolved iron particles. Use a strong stream of water to flush out any remaining particles and make sure the surface is thoroughly cleaned.
Step 6: Apply the wheel cleaner. Pour the wheel cleaner into a spray bottle or apply it directly onto the wheel surface with a brush or sponge. Follow the manufacturer's instructions for the recommended application time.
Step 7: Agitate the surface. Use a brush or sponge to agitate the wheel cleaner on the wheel surface, working it into the dirt and grime. If necessary, add a little water to help loosen the contaminants and make them easier to remove.
Step 8: Rinse the wheels. Rinse the wheels thoroughly with water to remove the wheel cleaner and any remaining dirt and grime. Use a strong stream of water to flush out any remaining particles and make sure the surface is thoroughly cleaned.
Step 9: Dry the wheels. Dry the wheels thoroughly with a clean, dry cloth to prevent water spots. Make sure to get into all of the crevices and nooks and crannies to ensure that the wheels are completely dry.

By following these steps, you can effectively use an iron remover with a wheel cleaner to keep your wheels looking their best. Regular use of these products can help extend the lifespan of your wheels and maintain their appearance and performance.
Leave a comment